
Pottery Barn Kids sponsored this post, but all opinions and content are 100% my own.
Transform Your Cozy Coupe: DIY Fire Truck Makeover for Halloween & Beyond!
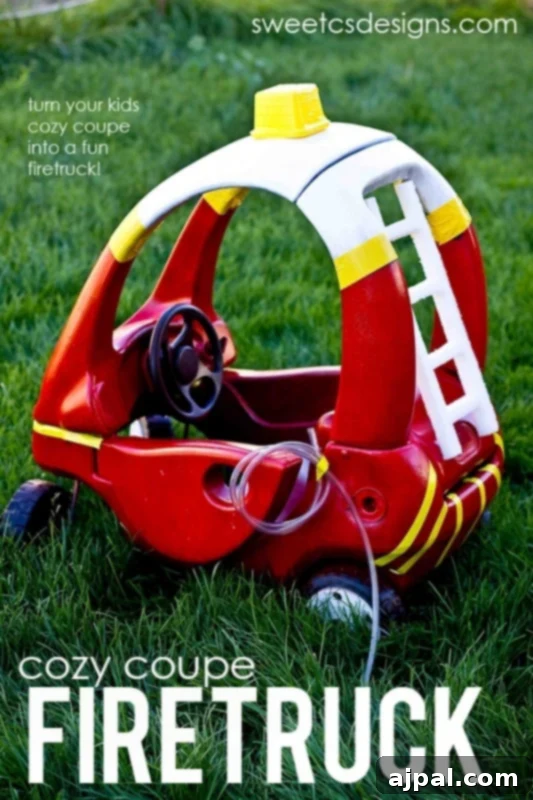
Last Halloween, my little man delighted everyone as Batman, cruising around in the incredible Batmobile I had crafted for him a year prior. Building on that tradition of unique, handmade costumes, this year’s inspiration comes from his current obsession: Fireman Sam! To fuel his imagination and make trick-or-treating extra special, I set out to create an ultimate Cozy Coupe Fire Truck.
There’s something incredibly rewarding about bringing your child’s favorite characters to life, especially for special occasions like Halloween. This DIY project isn’t just about a costume; it’s about crafting memories, fostering creativity, and providing a one-of-a-kind ride that will be cherished long after the candy is gone. Imagine the joy on your child’s face as they head out on their very own emergency vehicle adventure, ready to save the day!
For more inspiring Halloween ideas and spooky season fun, explore our full collection here!
Why Choose a DIY Cozy Coupe Fire Truck?
In a world of store-bought costumes, a handmade Cozy Coupe Fire Truck stands out. It’s not just a vehicle; it’s a statement of creativity, personalization, and love. Here are just a few compelling reasons why this project is a fantastic choice for your little firefighter:
- Unforgettable Memories: Watching your child proudly “drive” their custom fire truck will create lasting memories for the whole family, becoming a cherished part of their childhood stories.
- Personalized Touch: You have complete creative control to customize every detail to your child’s preference, from specific colors to unique decals, making it truly one-of-a-kind.
- Budget-Friendly Fun: Repurposing an existing Cozy Coupe is often significantly more economical than purchasing a brand-new, elaborate costume or specialized prop vehicle. A little paint and imagination go a long way!
- Eco-Conscious Choice: Giving new life to an old toy or a secondhand Cozy Coupe is a wonderful way to practice sustainability, reduce waste, and teach children about recycling and upcycling.
- Beyond Halloween: This isn’t just a one-night wonder! Your child will enjoy countless hours of imaginative play with their personalized fire truck long after trick-or-treating. It transforms their everyday ride-on into an exciting prop for daily adventures in the backyard or living room.
- Engaging Project for Families: While adults will handle the more complex steps, older children can participate in design choices, helping with non-toxic taping, or even painting smaller details, making it a fun and collaborative family activity.
Gathering Your Essential Supplies for the Ultimate Fire Truck Makeover
Ready to embark on this exciting transformation? The beauty of this DIY project lies in its relative simplicity and the readily available nature of the materials. Having all your supplies ready before you begin will make the process smooth and enjoyable. Here’s what you’ll need to bring your fire truck vision to life:
- A Cozy Coupe: The trusty base for our fire truck. If you don’t already own one, keep an eye out for used ones online, at garage sales, or thrift stores – they’re often available at a great price, and a fresh coat of paint will make it look brand new! Ensure it’s thoroughly cleaned and in good working order before you start.
- White Plastic Spray Paint: Specifically chosen for plastic surfaces, this will be used for the roof and any desired white accents. Look for a brand known for good coverage and durability.
- Red Plastic Spray Paint: The iconic, vibrant color for the main body of the fire truck. Again, ensure it’s formulated for plastics for optimal adhesion and a long-lasting finish. A bright, true red will really make your fire truck pop!
- Bright Yellow Scotch Tape: This will be crucial for creating those distinct emergency vehicle stripes and adding high-contrast detailing. Consider reflective or glow-in-the-dark tape if your trick-or-treating will happen in low light conditions, adding an important safety feature.
- Painter’s Tape: Essential for achieving precise lines and protecting areas you don’t want to paint. Wider tape (1.5-2 inches) is often easier to work with for larger sections, while narrower tape can be useful for intricate details.
- Styrofoam Sheet: Typically found in the floral or craft section of most craft stores. This material will be used to construct the lightweight yet sturdy ladder. Look for a thickness that offers some rigidity but is still easy to cut with a craft knife.
- Tubing for the Hose: Get creative with this! We cleverly repurposed some of “daddy’s homebrew tubing,” but you could easily use an old section of garden hose, flexible vacuum cleaner tubing, or even thick black rope for a realistic fire hose.
- Craft Knife or Sharp Utility Knife: Necessary for precise and clean cutting of the styrofoam. Always exercise caution and cut on a protected surface, away from your body, using a ruler for straight lines.
- Cold Hot Glue Gun and Glue Sticks: This is absolutely critical for assembling the styrofoam ladder. Regular high-heat glue guns will melt styrofoam on contact, leaving you with a sticky, gooey mess. Ensure your glue gun has a low-heat setting or is specifically marketed as a “cold” or “low-temp” glue gun.
- Optional Decorative Elements:
- Old Tupperware Container (lidless): Perfect for creating a realistic siren light on top of the truck. You can spray paint it or add a small flashing LED light inside.
- Decals or Vinyl Numbers/Letters: To personalize your truck with your child’s initial, a “911” or “Engine 1” graphic. These can be purchased, cut with a craft machine, or hand-painted using stencils.
- Clear Protective Sealant Spray: To apply as a final topcoat, helping to protect your vibrant paint job from scratches, minor scuffs, and weather elements, ensuring your DIY fire truck lasts longer.
- Drop Cloth or Old Sheets: To protect your work area from spray paint overspray.
- Safety Goggles and Mask: Important for protecting your eyes and lungs when spray painting.
With your comprehensive toolkit assembled, you’re now fully prepared to embark on this exciting transformation journey!
Step-by-Step Transformation: Crafting Your Ultimate Cozy Coupe Fire Truck
Now that you have all your materials, it’s time to bring this exciting vision to life! Follow these detailed steps to create a show-stopping Cozy Coupe Fire Truck that will be the envy of every trick-or-treater.
1. Preparation is Key: Cleaning and Taping for Precision
Before any paint touches your Cozy Coupe, it’s absolutely crucial to prepare the surface. Start by thoroughly cleaning the entire car with warm soap and water to remove any dirt, grime, or grease. A clean, smooth surface ensures optimal paint adhesion and a professional-looking finish. Once clean, let it dry completely, ensuring no moisture remains.
Next comes the painter’s tape – your best friend for achieving crisp, clean lines and preventing unwanted paint drips. This step might seem a bit tedious, but precision here pays off immensely in the final look. Carefully apply the painter’s tape to clearly demarcate the areas you intend to paint white from the sections you’ll paint red. I opted for a smaller white roof section, creating a distinct two-tone look reminiscent of classic fire engines, but you can adjust this division to your preference. Ensure the tape is pressed down very firmly along all edges to prevent any paint from bleeding underneath. Using thick painter’s tape is recommended as it’s designed for clean removal and will save you a lot of touch-up time later.
2. The Power of Paint: Laying Down Your Base Coats
With your Cozy Coupe perfectly taped and ready, it’s time for the vibrant transformation to begin! Always work in a well-ventilated area, preferably outdoors or in an open garage, and lay down a drop cloth or old sheets to protect your surroundings from overspray. Don’t forget your safety goggles and mask.
Start with the white plastic spray paint for the roof section. Apply thin, even coats, moving the can steadily from side to side. Avoid holding the can in one spot to prevent drips. Allow each coat to dry to the touch before applying the next – usually about 15-20 minutes. Several thin coats are always superior to one thick coat, as this prevents drips, ensures even coverage, and results in a much more durable, professional-looking finish.
Once the white paint is completely dry (overnight is highly recommended for full curing and to prevent smudging), proceed with the red plastic spray paint for the main body of the car. Use the exact same technique of thin, even layers, allowing adequate drying time between each. Patience is a virtue in this stage; allowing ample drying time before moving to the next step will result in a significantly more durable and attractive finish that will stand up to enthusiastic play.
3. Adding Authentic Details: Stripes and Emergency Accents
Once both the red and white base coats are thoroughly dry and cured, carefully and slowly remove the painter’s tape that separated the two colors. You should now be greeted with a perfectly crisp, clean line!
Now, it’s time for the signature fire truck stripes. Take your bright yellow Scotch tape and apply it along the seam where the red and white paint meet. For a truly authentic look, I wrapped the tape continuously around the structural poles of the car, forming a bold dividing line that instantly screams “emergency vehicle.” This yellow stripe not only adds to the aesthetic but can also significantly enhance visibility, especially if you opted for reflective or glow-in-the-dark tape for nighttime trick-or-treating safety.
Extend the stripe detailing by taping off a few horizontal stripes on the back of the Cozy Coupe, extending under the car into the “trunk” area. These stripes add visual interest and mimic real fire truck designs. I also added a playful, curved stripe across the front, which, to me, gives the car a cheerful, smiling appearance – perfect for a friendly neighborhood firefighter!
4. Crafting the Iconic Fire Ladder
No fire truck is complete without its iconic ladder! For a safe, lightweight, and easy-to-handle option for younger children, styrofoam is the perfect material. Grab your sheet of styrofoam from the craft store.
Using a long, sharp utility knife and a sturdy ruler, carefully cut the styrofoam into long strips for the vertical sides of the ladder and shorter strips for the rungs. While perfection isn’t strictly necessary, aiming for relatively straight and uniform cuts will make the assembly process much easier and yield a more polished final product. This step can be arguably the most challenging part of the entire project, so take your time and cut on a protected surface.
Crucial Tip: When assembling the ladder, you MUST use a cold hot glue gun or one with a low-heat setting. Regular high-heat glue guns will instantly melt styrofoam, creating a sticky, dissolved mess. Ensure your glue gun is specifically designed for low-heat applications. Once your ladder pieces are neatly cut, use the cold glue gun to securely attach the rungs between the long vertical strips, forming a classic ladder shape. Once assembled and dry, I hot glued the finished ladder onto the back of the Cozy Coupe, positioning it so it’s clearly visible through the back window. The addition of the ladder brings incredible authenticity and charm to the entire vehicle!
For older children who might be less prone to bumps and knocks, or if you desire a more robust ladder, you could consider making it out of thin wood strips or lightweight PVC pipes for added durability. However, for my 3-year-old, the lightweight and forgiving styrofoam was undoubtedly the safest and most practical choice.
5. The Finishing Touches: Siren, Decals, and Hose
Now for the exciting final details that truly bring your Cozy Coupe Fire Truck to life and make it uniquely your child’s!
- Siren Light: I cleverly repurposed an old, lidless Tupperware container, securing it to the top of the Cozy Coupe with strong tape or adhesive to act as a realistic siren light. You could spray paint it bright red, yellow, or blue, or even insert a small, battery-operated flashing LED light inside for extra realism and visibility during trick-or-treating. Other creative ideas include a painted plastic ball or a small, round craft foam piece.
- Personalized Decals: Consider adding custom numbers (like “Engine 1,” “Engine 911,” or your child’s age), your child’s initial, or fun fire department decals to the sides, front, or hood of the truck. These can be easily cut from vinyl, printed on sticker paper, or even hand-painted with stencils for a truly personalized touch.
- Fire Hose: Our repurposed homebrew tubing made the perfect, flexible fire hose! Secure one end of the tubing to the side of the Cozy Coupe (perhaps near the “driver’s side door”) using a strong zip tie, adhesive, or even a small hook. You can coil the rest and allow it to hang freely, ready for action. This small but significant detail adds a huge amount of play value and encourages imaginative scenarios.
Step back and admire your handiwork! Your Cozy Coupe has been completely transformed into an amazing, custom fire truck, ready for any emergency (or trick-or-treating adventure)! If you used a protective sealant spray, now would be the time to apply it according to the product instructions, ensuring your masterpiece withstands countless hours of play.
Beyond the Build: Completing the Firefighter Experience
A magnificent DIY fire truck deserves an equally impressive crew! Completing your child’s Halloween look with a fantastic costume and a themed treat bag will elevate their trick-or-treating experience to an unforgettable level.
The Perfect Fireman Costume
Now that your little one has their incredible DIY Fire Truck, they’ll need a spiffy new fireman costume to match their emergency vehicle! I’m absolutely delighted by this adorable one from Pottery Barn Kids, which perfectly complements the vibrant red of the Cozy Coupe. When choosing a costume, always prioritize comfort and durability, especially for active toddlers who will be running, sitting in their truck, and collecting candy. It’s often a practical idea to size up slightly so they can wear warm layers underneath if Halloween night proves to be chilly. Plus, sizing up means they can enjoy their costume for dress-up play all year long – a true win-win for extended imaginative adventures!
Trick-or-Treating in Style: The Fire Truck Treat Bag
And how utterly cute is this fire truck treat bag? My little man definitely needs one, ASAP! A themed treat bag isn’t just a functional item; it truly completes the entire firefighter ensemble and adds an extra layer of excitement to the trick-or-treating experience. Imagine them proudly collecting their candy, a miniature fire truck driving their treats, perfectly matching their ride-on vehicle!
For those looking for fantastic deals to complete their Halloween look, don’t miss out! Click here to get 40% off select treat bags, and 20% off select costumes! This is the perfect opportunity to snag high-quality accessories that will last beyond just one Halloween. I’m already planning to buy his costume one size up so he can wear it for dress-up fun throughout the year. Perhaps we’ll even take his custom truck for a spin over at the local fire station to see some bigger, real-life ones – a field trip truly fit for a hero!
Share Your Creativity & More Halloween Fun!
Do you have a handmade Halloween costume or a unique DIY project you’re incredibly proud of? I’m always looking for inspiration and would absolutely love to see yours! Crafting these personalized items not only often saves money but also creates truly cherished memories and establishes wonderful family traditions.
I’m going to be sharing some additional fun Halloween ideas very soon, covering everything from more clever costume inspiration to spooky decorations for your home and delicious, themed treats. Make sure to stay tuned so you don’t miss out on more festive ideas!
And if you’re looking for even more creative and delightful Halloween ideas to make your spooky season extra special, please check out some of my other posts! From ingenious costume hacks to festive home decor ideas that are easy to recreate, we’ve got your entire spooky season covered with inspiration and practical tips.