
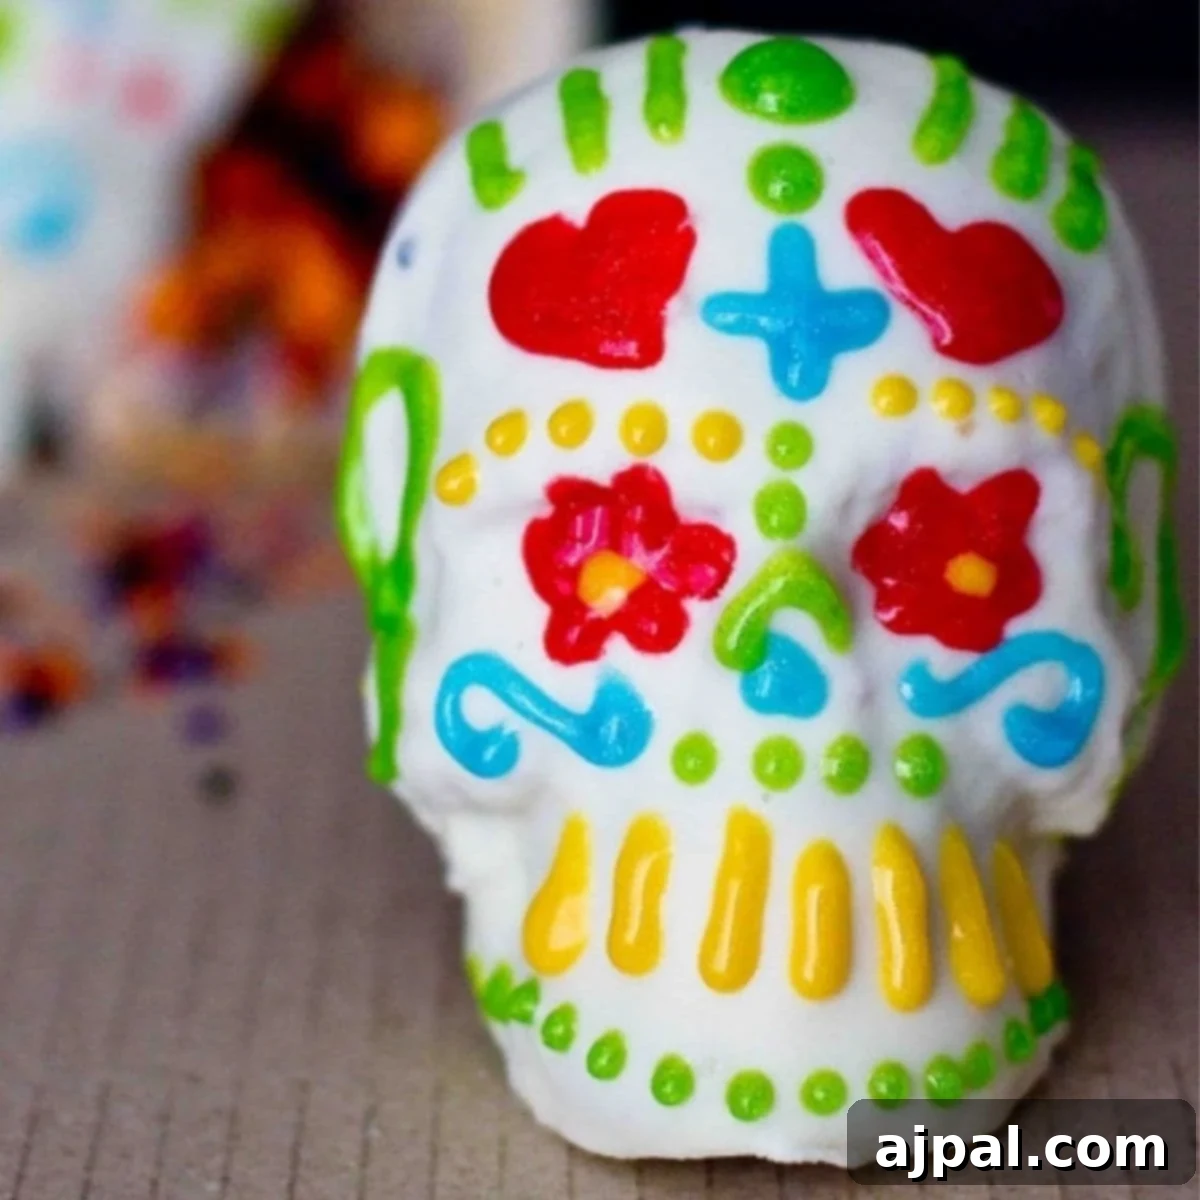
Dia De Los Muertos Mini Confetti Cakes – A Vibrant Celebration in Every Bite!
Crafting Captivating Dia De Los Muertos Mini Confetti Cakes
Embrace the vibrant spirit of Dia de los Muertos with these delightful Mini Confetti Cakes! Shaped like intricate sugar skulls and filled with a playful burst of sprinkles, these treats offer a fun, surprising element that perfectly complements any festive gathering. Imagine biting into a beautifully decorated skull cake, only to discover a colorful cascade of sprinkles and candies hidden within – a truly joyful experience for both the eyes and the palate.
These stunning mini cakes, decorated to resemble traditional sugar skulls, are not only a feast for the eyes but also surprisingly simple to create, especially with the right tools. I was thrilled to join the “13 Days of Sweet Halloween Treats” campaign, generously supplied with Wilton products by Joann Fabric and Craft stores. All opinions expressed here are, as always, 100% my own. The moment I unboxed the Wilton goodies, the skull-shaped cake pans immediately sparked my creativity, inspiring me to craft these festive Dia De Los Muertos Mini Confetti Cakes.
What makes these cakes truly special is their deceptive simplicity. While they boast an incredibly detailed and intricate appearance, the process is straightforward, even utilizing store-bought frosting to achieve a luxurious, faux-fondant finish. Don’t let their elaborate look intimidate you; with a few easy steps, you’ll be creating these impressive treats in no time.
The Cultural Significance of Dia de los Muertos and Sugar Skulls
Before diving into the recipe, it’s worth understanding the rich tradition behind Dia de los Muertos, or Day of the Dead. This beautiful Mexican holiday, celebrated primarily on November 1st and 2nd, is a time for families to honor and remember their deceased loved ones. Far from a somber occasion, it’s a joyous celebration of life, memory, and the continuation of the spirit world.
Sugar skulls, or “calaveras de azúcar,” are one of the most iconic symbols of Dia de los Muertos. These edible or decorative skulls are often brightly colored and intricately adorned with icing, beads, and glitter, each representing a departed soul. They are placed on altars (ofrendas) alongside photos, favorite foods, and cherished possessions of the deceased, serving as a sweet reminder of life’s cyclical nature and a loving tribute. Our mini skull cakes draw inspiration from this tradition, allowing us to bring a piece of this beautiful cultural expression into our kitchens and celebrations.
Essential Ingredients and Tools for Your Mini Skull Cakes
Gathering your ingredients and tools beforehand will ensure a smooth baking and decorating process. Here’s what you’ll need to create your own Dia De Los Muertos Mini Confetti Cakes:
Ingredients:
- Your favorite cake batter (store-bought mix or homemade – about 1 standard box mix quantity)
- Store-bought frosting (white or light-colored, sufficient for sealing and a thick coat – about 2-3 standard tubs)
- Assorted sprinkles (the more colorful, the better!)
- Small candies (e.g., malted milk balls, mini chocolate candies, M&Ms) for the surprise filling
- Wilton gel icings in various vibrant colors (red, yellow, blue, green, black are excellent choices)
Tools:
- Wilton skull cake pan (essential for achieving the skull shape)
- Non-stick cooking spray or butter/flour for greasing the pan
- Cooling rack
- Small spoon or melon baller for hollowing out cakes
- Offset spatula or butter knife for spreading frosting
- Microwave-safe bowl (for the poured frosting method)
- Optional: Disposable piping bags for more intricate gel icing designs
Step-by-Step Guide: Crafting Your Festive Skull Cakes
Ready to get started? Follow these detailed instructions to create stunning and delicious Dia De Los Muertos Mini Confetti Cakes that will delight everyone.
Step 1: Baking Your Skull Cake Halves
Begin by preparing your cake batter according to your chosen recipe or mix instructions. The star of this step is the Wilton skull pan, readily available at Jo-Ann Fabric and Craft stores. Even though the pan boasts a nonstick surface, it’s crucial to generously grease and flour it (or use a baking spray with flour) to ensure your delicate skull shapes release perfectly. This extra step prevents any sticking and preserves the intricate details of the mold.
Carefully fill each cavity of the skull pan just slightly over halfway. This specific fill level is vital because we need two halves of each skull cake to fit together perfectly, without overflowing during baking. Overfilling can lead to mushroomed tops that are difficult to join. Bake according to your cake recipe’s instructions, or until a knife or toothpick inserted into the center of a cake comes out clean. Once baked, let the pan sit for about 10-15 minutes to cool slightly. This cooling period helps the cakes firm up, making them less prone to breaking upon removal. To effortlessly remove the cakes, place a cooling rack directly on top of the pan and, holding both together, carefully flip them upside down. The cakes should pop right out onto the rack. Allow the cakes to cool completely for at least one hour, or ideally overnight, before proceeding. This ensures they are firm enough for hollowing and handling.
Step 2: Hollowing Out the Surprise Center
Once your skull cake halves are completely cool, it’s time to create the “confetti” surprise. Using a small spoon, a melon baller, or even a paring knife, carefully scoop out a small cavity in the flat, cut side of each cake half. Be mindful not to scoop too deeply or too close to the edges, as you need enough cake structure to hold the filling and to join the halves. The goal is to create a pocket for your goodies.
Now for the fun part: filling! Generously add an assortment of colorful sprinkles and small candies into the hollowed-out sections. Malted chocolate candies, mini M&Ms, or other small, firm candies work wonderfully alongside a vibrant mix of sprinkles. The more variety, the more exciting the surprise will be when the cake is finally cut open!
Step 3: Assembling Your Skull Cakes with Frosting
With your cake halves filled, it’s time to “seal” them together to form a complete skull. Take one filled skull half and apply a generous layer of frosting around the flat edges, much like you would apply glue. Then, carefully place a second filled skull half on top, aligning the edges to form a full skull. Gently press the halves together to create a seal, ensuring the sprinkles and candies are fully enclosed within. The frosting acts as an edible adhesive, holding the two halves securely. It’s best to use the frosting straight from the can for this step, as its thicker consistency provides a stronger bond. This sealing process should be done before moving on to the main frosting method, allowing the “glue” to set slightly.
Step 4: The Poured Frosting Method for a Faux Fondant Finish
Now, let’s achieve that stunning, smooth, faux-fondant finish! This technique uses store-bought icing but transforms it into a glaze-like coating that sets beautifully, giving your mini skull cakes a professional touch without the fuss of actual fondant. For detailed instructions on this method, I highly recommend referring to my original post here: The Easiest Way to Frost a Cake Ever. It contains a wealth of information and tips that are truly beneficial for achieving the best results.
In brief, the method involves slightly warming the store-bought frosting until it reaches a pourable consistency, similar to a thick glaze. You then carefully pour this frosting over your assembled skull cakes, allowing it to coat them evenly and smooth out any imperfections. The beauty of this technique is that once it sets, the frosting becomes firm and touchable, much like fondant, but without the complicated rolling and shaping. Apply a thick enough layer to ensure a flawless, opaque finish. After frosting, allow the cakes to set for at least one hour, or until the frosting is firm to the touch. This crucial setting time prevents smudges and creates a perfect canvas for your intricate gel icing designs.
Step 5: Unleashing Your Creativity with Decorations
With the poured frosting set, it’s time for the most exciting part: decorating your Dia De Los Muertos mini skull cakes! This is where you can truly honor the spirit of the holiday by embracing vibrant colors and intricate designs. Think of traditional sugar skulls – they are rarely minimalist! Grab your red, yellow, blue, green, and other colorful Wilton gel icings and let your imagination run wild.
Add an abundance of dots, swirls, lines, hearts, flowers, leaves, and any other patterns that inspire you. Don’t be afraid to layer colors and textures. The more decor, the better! Remember, the people celebrating Dia de los Muertos decorate skulls as an honor to deceased loved ones, reflecting the beauty and vibrancy of life and memory. So, bring on the color, the intricate patterns, and the heartfelt designs. Each cake can be a unique piece of art, a small tribute, and a joyful expression of creativity.
Tips for Dia de los Muertos Cake Success
- Don’t Rush Cooling: Allowing cakes to cool completely is paramount. Warm cakes are fragile and prone to breaking when handled or frosted.
- Grease Generously: Even non-stick pans benefit from a thorough greasing and flouring to ensure a clean release of detailed shapes.
- Perfect Poured Frosting: If your frosting is too thin, it won’t provide enough coverage; if too thick, it won’t pour smoothly. Adjust consistency by adding a tiny bit of milk or powdered sugar as needed.
- Practice Makes Perfect: If you’re new to gel decorating, try a few practice swirls and dots on a piece of parchment paper before decorating your cakes.
- Embrace Imperfection: The beauty of hand-decorated sugar skulls often lies in their unique, artisanal quality. Don’t strive for machine-like perfection; let your personal touch shine through.
Join the Sweet Halloween Treats Celebration!
I know you’re eager to try your hand at creating your own enchanting Dia De Los Muertos Mini Confetti Cakes and other Halloween sweet treats! To help you along, don’t forget to grab the special coupon for 50% off one item at Jo-Ann Fabric and Craft Stores – it’s available at the bottom of the page. This campaign was a fantastic opportunity to explore creativity, and I highly recommend checking out the other incredibly talented bloggers who participated in the “13 Days of Sweet Halloween Treats” campaign:
- October 1st: Skip to My Lou
- October 2nd: Blissful and Domestic
- October 3rd: Positively Splendid
- October 4th: The Crafty Blog Stalker
- October 5th: The Girl Inspired
- October 6th: 4 You with Love
- October 7th: That’s What Che Said
- October 8th: Family Ever After
- October 9th: Baby Loving Mama
- October 10th: Sweet C’s Designs
- October 11th: A Pumpkin and A Princess
- October 12th: Polka Dot Chair
- October 13th: I Don’t Know How She Does It
These Dia De Los Muertos Mini Confetti Cakes are more than just a dessert; they are a celebration of culture, creativity, and the joy of a sweet surprise. Whether you’re honoring loved ones, hosting a festive gathering, or simply want to try a unique and colorful baking project, these skull cakes are sure to be a memorable hit. Get your Wilton supplies, unleash your inner artist, and prepare to delight everyone with these stunning and delicious treats!
And for those looking to stock up on the fantastic Wilton products used in this tutorial, don’t forget to utilize this valuable coupon at Joann’s for 50% off one item! Happy baking and decorating!